What's So Great About Project Based Learning?

I read an interesting article recently that talked about the "Peak Moments" in our learning experiences and how they tend to be things that happen outside of the classroom.  Extra curricular activities such as sports, band, and social events tend to top the memory of peak moments in our K-12 school experience. As a teacher, I have to say this made me a little sad.  We just covered the topic of memory in the STEM ED course I teach, and how memory plays such a huge role in education.  Giving our students learning experience that are engaging and memorable should be a top priority for educators. 

Project Based Learning is one teaching practice that can meet this need. Project Based Learning is a teaching practice that brings real life scenarios to students and allows them to use a variety of skills from many subject areas to solve a problem.  It really is the perfect way to integrate subjects and bring that all important relevance to students.  Research supports that creating these memorable and engaging learning experiences for students pays dividends in so many areas; critical thinking, problem solving skills, collaboration, and memory recall.  

Affording our students the opportunity to apply skills to new situations is the ultimate goal of education.  PBL does just that.  Combining PBL with cooperative groups also allows students to develop communication and collaboration skills, all skills they will need in their future careers.  

I love creating Project Based Learning products and have made quite a few over the years.  Here are a few of my favorites:

    
What are some "peak moments" that you remember from your learning?  What are some "peak moments" you have created for your students?  Share in the comments below.

The Pandemic Has Changed Teaching Forever

As I sit here preparing for the upcoming school year, I can't help but notice how much teaching has changed in the past year.  Teachers have learned so much about being flexible and finding new ways to teach students. I worked so hard last year converting a lot of my teaching materials to digital, even for the in person teaching I did.  Limiting the passing out of papers became easy after a while, and I think my students liked being able to access everything with the click of a mouse.

This year I still plan to use many of the digital tools and resources I created last year.  For one thing, it's a time saver not having to go make copies of activity sheets for students. It's also super efficient when I don't have to waste time passing out papers. 

As this fall unfolds, the uncertainty can't be ignored.  Numbers in my state of positive covid tests are skyrocketing, and with the elementary students unable to get vaccinated at this point, I can't help but wonder what will be happening once we get all the kids back in classrooms over the next few weeks.  

Mask mandates are now required once again in my workplace.  Attendance trackers are back, and preparing for the possibility of having to return to online teaching is a reality we all face.

I spent A LOT of time over the summer updating my science products that I sell on TpT to include a digital option.  I hesitated to convert hands on science activities to digital, because for one thing, they are hands on lessons.  But once I got to work looking at the activities and thinking of ways to modify for digital, it became clear that science can effectively be taught at a distance.  Yes, students do need science materials to really learn science concepts, but I did this last year by creating take home science kits that students picked up at the beginning of the semester.  If you teach younger students, you could provide a list of materials parents could provide for each unit. 


Having options for teaching delivery is the new normal for the 2021-2022 school year.  Being prepared will make your school year run smoothly, even when you have to pivot back and forth, like many of us did last year.  Leave a comment below to share some things you will be doing differently this year.

Here's to a successful and engaging new school year!  Wishing you all the best!


Dr. Jan


You Can Still Teach Hands on Science......Even from a Distance!

 A new semester has begun for me, and this will be my second semester of teaching an Elementary Science Methods course to pre-service teachers remotely.  Teaching hands on science remotely seems like quite a paradox, but I've learned that it doesn't have to be!

My philosophy of teaching science is a constructivist approach, which means I have a strong belief that people (students and adults) learn science concepts best if they get to experience science though hands on experiences.  One strategy I have always used in my science methods class is to have my university students take on the role of elementary students and engage in activities and experiments in class.  With the remote class I've had to think a little outside the box.

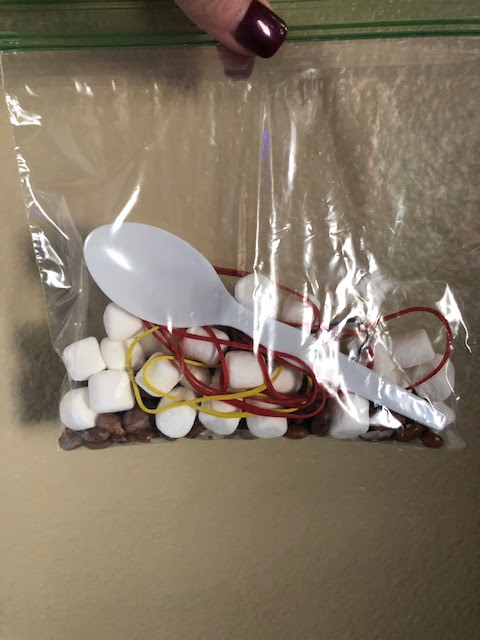
One strategy I am currently using is to make take home science kits for students.  I began by brainstorming experiments and activities that could be done with easy to access and inexpensive materials  I also wanted the experiments to cover a wide range of science topics to give my students experiences in all areas of science.  The kits I created include a battery, a piece of insulated wire with the ends stripped, a mini lightbulb, a pipette, 10 sugar cubes, a film canister, 2 Alka Seltzer tablets,  a snack bag containing rice, mini marshmallows, beans, and rubber bands, plastic tweezers, a toothpick and  a plastic spoon,  a magnet and a piece of foil.  These simple materials will allow my students to engage in 6 different science activities or experiments. They easily fit in a gallon sized Ziploc bag, and students can come to campus to pick them up.

Experiment 1:  Let Their Be Light

Students are tasked with trying to light a lightbulb using a wire, a bulb, and a battery.  No directions are given so that students can experiment. They then make simple sketches of ways that worked, and ways that did not.  The drawings can serve as a great starting point for discussion.  Simply asking, "What do you notice about the ones that did work?" can get students to understand what a complete circuit is. 

Experiment 2:  Weathering Activity

Students build mini houses using their sugar cubes.  They are then directed to "rain" lightly on their homes using a pipette and a small cup of water.  Although our homes don't dissolve with rain, this activity shows the power of water on softer rocks such as sandstone.  


Experiment 3:  Film Canister Rockets

This activity involves the chemical reaction of Alka Seltzer tablets in water.  The gases build up inside the film canister and force the cap to fly off.  The idea of Newton's 3rd law that states for every action there is an opposite and equal reaction is demonstrated. This activity does require safety reminders and can be conducted in two ways.  Students can put water in the film canister and then add the Alka Seltzer and quickly put the cap on and turn the canister cap side down.  Or, a safer option is to place the canister on it's side so that it launches across the floor instead of straight up.   Time in flight can be used to measure option 1, and distance can be used to measure option 2.  Students can be challenged to change the amount of water and/or the amount of Alka Seltzer for the best launch. 

Experiment 4:  Birds and Beaks

For this activity students investigate different beaks and discover which kind of food is more suitable for different beaks.  Students spread out the materials in the sandwich bag (beans, mini marshmallows, rubber bands, and rice)  They then "eat" using different types of beaks (spoon, tweezers, toothpick) for 30 seconds. The rule is they can only pick up one piece of food at a time using the beak in the way it was intended.  They can put the "food" into a cup. I make a google sheet for students to record how many of each type of food they eat and then students look for patterns and discuss what they notice. 


For experiment 5 I included a magnet to allow student to do some investigating with magnets.  I also included a piece of foil for experiment 6 to allow students to investigate the engineering design process to see how many pennies a foil boat they construct can hold. 

I have the students conduct some of the experiments with me over Zoom, and for some experiments I used videos in apps like Nearpod and EdPuzzle to have students work through the experiments with me asynchronously.   Feedback I've received from last semester indicates that students really appreciate getting to experience science through hands on opportunities, so I think me extra effort is well worth it. 

Do you have some simple science activity ideas that might work well for take home science?  Share your ideas in the comments below. 


Distance Learning Apps and Platforms to Engage Students

I've been on a steep learning curve journey the past few weeks trying to learn new ways of teaching in the new frontier of distance learning.  Even though I teach at the university level, I feel that many of the apps I have discovered can be easily used in K-12 as well.  I've had to completely redesign a few of the courses I am teaching this semester and it's been a journey!  The word that my colleagues and I seem to be repeating often is "overwhelmed".  Hopefully my descriptions of these apps can help you design engaging learning opportunities for your students, even when you are not with them.  


1.  Flipgrid:  Flipgrid is an easy video app where you and your students can make mini videos.  It feels a little more personal when you can see each other's faces.  The other thing I love about this platform is that you can also reply with a video.  It's sort of like a visual discussion board, which makes things much more engaging for students.  You can create a free class account and share the code for the class with students so they can find it easily.  You can create individual assignments within each class with descriptions and prompts on what students need to discuss in the video.  You can also adjust the time frame when you set up assignments; the default is 90 seconds, but you can make it longer or shorter.  I found this video helpful in learning a few more tricks in Flipgrid.  Flipgrid is free.  Here's a screen shot of my home page for my STEM ED Course.  I have added 2 assignments so far. 

EdPuzzle:  Edpuzzle allows you to upload videos you want your students to watch, with the added tool of inserting questions throughout the video.  The video will actually stop until the viewer has answered the question.  You can go back to your EdPuzzle account and see what students responded.  This platform gives students accountability for watching videos.  One thing I learned with this one is that you need to ask the students what their names are right away so you have record of each student's participation.  You can find videos that are already out there, or you can make your own.  I've even recorded Zoom sessions with screen share of a PowerPoint and then uploaded those to EdPuzzle so that I can ask questions throughout.  Ed Puzzle is free for up to 20 videos stored per free account. 

3.  Nearpod:  This is probably my favorite so far.  I am using this app for many of my asynchronous teaching days where I am not on live Zoom.  This app allows you to use powerpoints and insert all different kinds of interactive media.  You can insert open ended questions, polls, web pages, simulations, and even your voice.   If you use Google Drive to create slides you can install the Nearpod Add On which makes it super easy to use by allowing you to insert the interactive pieces right into your google slides presentation.  For this one after you create the interactive presentation you get a code to share with your students.  Nearpod is free for the "Silver" level.  You can pay to get more benefits.

4.  Voxer:  Voxer is a walkie talkie type app where students can use their phones to have conversations regarding a reading or specific assignment.  I am using this as a collaborative tool and making "Voxer Groups" so that groups of students can have a discussion group.  Each group has to add me as well so that I can listen in.  Voxer is free for the basic app.

Take some time to check these platforms out and be patient with yourself.  It took me a week or so to get comfortable with each of these.  I'm excited to give my students some engaging tools to help with the distance learning aspect of learning.  

Are there any other apps or platforms that you have discovered?  If so please leave a comment and share your experiences.  We really are all in this together!

Now What? Making the Transition to Learning (and Teaching) From Home

Just a week ago I was hitting golf balls enjoying a nice spring afternoon.  Now I am self-isolating and attempting to teach my college students from home.  It's been quite a scramble to get things figured out, and honestly, it's still a process.  I've read several articles floating around out there, and the biggest message I am hearing is, we don't need to feel like we have to do everything perfectly.  Some things are going to have to go.  What we need to do as educators is find ways to educate students as best we can, and not be so hard on ourselves.  I decided on a very simple format for my college students taking an introductory 1 credit education class.  It's one page of directions with  a "Read This" section with links to articles related to the topic of the week, a "Watch This" section with links to videos for them to watch, and a "Do This" section for them to complete a discussion board thread post or written reflection with prompts.  We need to remember that our students are also transitioning to this online learning from home challenge that they did not sign up for.  I think keeping things simple and demanding a little less of them during these times is the right thing to do.

After deciding on this simple format for my college students, I got to thinking about the K-12 students.  I create science curriculum mostly for elementary level students, and my philosophy is highly inquiry and hands on learning.  But with this wrench in the system, it might not be feasible to ask students to find the materials to conduct hands on lessons that are normally done in schools.  I decided to create some new resources that students could use at home to continue their learning of science topics.  Adopting a similar format to my college class, I have 4 sections:  Read This, Watch This, Do This, and Try This.  The "Try This" is an attempt to give the home-bound students an opportunity to do some sort of hands on learning using simple materials that can be found at home.  Each of the topics is sold separately, but I also have a Growing Bundle of all the topics that I will continue to add to over the next several weeks.  Check it out by clicking on the image below.


Here's to getting through this challenge with grit and determination.  Take care of yourself, don't try to be perfect, and help keep those kiddos learning!

Tips for STEM Night Success

I recently was tasked with planning a STEM night at a rural school in our state.  I worked with one of our graduates who is currently teaching at the middle school to coordinate activities and presentations for the elementary students of the community.  We trained the middle school students to facilitate the activities with the help of some of my college students. 

Here are 10 things I have learned from planning and carrying out this STEM Night:
1.  STEM nights are A LOT of work!
2.  Communication is the key to good attendance.
3.  Using social media to share about the event works well!  Most schools/school districts have Facebook pages.
4.  People don't tend to RSVP even when an email RSVP form is sent to every family.
5.  Find a guest speaker/presenter to kick off the event.
6.  Volunteers appreciate food.
7.  Plan and prepare plenty of materials for the activities.  It's better to have too many than not enough.
8.  Spread activities out.  We used the cafeteria for the more mellow activities, and used classrooms for the louder ones and ones with projectiles. (Check out my STEM night product for activity ideas here).
9.  Take pictures!  (This is where I didn't do so well; I was distracted with organizing)
10.  Get there early to get set up and organized.  This will ease your stress on the day of the event.t

I have participated in tons of STEM nights in my years of teaching, but this was the first one I actually coordinated.  The biggest worry for me was that no one would show up.  Since hardly any families RSVP'd I seriously didn't sleep the night before.  But thankfully, people did show up and all my worries were for nothing. 


Another great bonus that I was fortunate enough to have was a guest speaker who was a real live astronaut.  I truly believe the NASA astronaut was a huge draw for the community, and many wanted to come and listen to his presentation before the activities began. 


So my big take away is that this was a TON of work, but it was so worth it in the end.  Seeing the kids smiling faces was amazing, and the turn out of volunteers was very impressive.  Especially since they had to drive more than an hour to get to the school where the event was held.


New Year, New Science Goals!

Life as an elementary teacher is challenging to say the least.  One of the biggest challenges is trying to juggle all of the different subjects and find time for everything.  Coupled with the pressure for students to perform well on standardize tests, it's no wonder that science often takes a back seat.

Do your students a favor, and find ways to make science more of a priority in 2020.  There are a variety of ways to work smarter, not harder when fitting science into your school week.  Here are some ideas to get you started:

1.   Science Friday: When I taught 5th grade, I had great success with committing to teach science on Fridays; once before lunch and again after lunch.  That gave my students about an hour an a half of science for the week.  Fridays worked well for me with my specials schedule and it had the added side affect of getting kids to school on Fridays.  For some reason, that day is notorious for student absences, which doesn't fit so well with weekly spelling tests and other assessments. With Science Friday, the kids looked forward to it and made sure they didn't miss school that day.

2. Team Teach:  If you have a big enough school with more than one teacher at your grade level, try team teaching science.  Get super prepared and immersed in one science unit and become the expert at your grade level.  Trade students or rotate classrooms to teach each other's students the one unit you've become a pro at. 

3. Science Centers:  Science centers are a super efficient way to get all concepts in and let students do hands on experiments without needing enough materials for the entire class.  Set up 5 centers around the room for a week and have students rotate to one each day.  Students should be able to do a quick science activity and have an opportunity to write about their experiences in a journal in a 30 minute time frame.


4.  Integrate Science:  Students are naturally engaged with science topics due to their curiosity about their world.  Try flipping things around and using science as the central theme or topic to integrate with language arts and mathematics.  There are plenty of opportunities for reading and writing in science, and mathematics is a natural fit, especially with data and data analysis.

Give some of these ideas a try!  Your students will thank you for fitting one of their favorite subjects in!